It’s taken about-a-million tiny steps, but as of this moment (2 May, 2024 07:42 UTC-6) this WordPress blog (jjj.blog) and a bunch of other blogs for friends & family are all calling from inside the house running on a cluster of Raspberry Pi 4’s in a server rack in my basement.
-
Self Hosted
-
Basic HomeKit troubleshooting
In general… weird things happen to Apple devices when the network services they depend on (to quickly communicate between each other on your network) are disabled, out-of-date, or in any kind of corrupt or malformed state (which it almost always is).
You want to sign in to your routers Admin GUI, and look for the following:
- Something like: “Multicast”, “mDNS”, “Multicast DNS” or equivalent.
Make sure this is not off or disabled.
The intended purpose of mDNS is for your router to act as a “zero-configuration” resolver for the hostnames & IP addresses on your network, and its what Apple/AirPlay/AirPrint/AirDrop/HomeKit/etc… use to route their many-to-many device relationships – I.E. every iPhone to any other iPhone/HomePod/TV/etc…
You may only be able to toggle in on/off, or you may have a select/radio-button option to pick some specific thing. Use your best judgement, or reply here if unsure. - Something like: “IGMP Snooping” or equivalent.
Make sure this is not disabled.
The intended purpose of IGMP is to have your router monitor your LAN traffic and route mDNS streams & requests directly between registered clients, rather than have those clients chatter back & forth on the entire network.
Probably on/off, and should not give you multiple options. Reply if unsure. - Somehow confirm nothing is reserving or using “.local” for their own routing on your network.
mDNS uses “.local” exclusively to alias the names of devices on your network that have advertised that they prefer to communicate that way. If you’ve reserved it manually, or some development environment (Valet, MAMP, etc…) has, this is a problem that needs fixing. - Make sure all wireless TVs & HomePods have excellent wifi signals. Not just good or acceptable; excellent. For every 1db lost from “full” signal strength, expect 2x data packets to be retried exponentially.
Give them a clear line-of-sight – no obstructions, walls, plants, chairs, tables, etc… Everything between them will cause attenuation & signal degradation, resulting in dropped data packets & weird behaviors. - Restart everything, doing the router last.
DHCP reservations (IP reassignments) rotate unless they are pinned or assigned manually. Usually, restarting a device will force it to reconcile its network assignments, including IP addresses, hostnames, and mDNS by association. - Sometimes (and this is my experience) if you have multiple “home hubs” like you do (TVs, HomePods, etc…) one of them has a tendency to work better than the others. For me, when one specific Apple TV is the “active” HomeKit hub, everything is fine, but any other hub causes all of my automations to never fully finish. I am convinced this is an Apple bug with their own on-device mDNS caches, but haven’t dug into it.
- Something like: “Multicast”, “mDNS”, “Multicast DNS” or equivalent.
-
Raspberry Pi PoE Hat Fan Control
I noticed yesterday that the fans on the PoE Hat of my Raspberry Pi 4’s were behaving strangely. They were both kicking on based more on time than temperature, even though neither of them seemed that hot.
You can check the temperature via the command line like this:
/opt/vc/bin/vcgencmd measure_temp
And you’ll get something like:
temp=42.0'C
That didn’t seem hot enough to me to warrant the fans going full blast, and it doesn’t help that these fans have a high-pitched whine to them, making them audibly louder than all of my rack mounted Ubiquiti gear.
I decided to take the fan configuration into my own hands, but I had to go hunting for the proper settings first.
Name: rpi-poe
Info: Raspberry Pi PoE HAT fan
Load: dtoverlay=rpi-poe,<param>[=<val>]
Params: poe_fan_temp0 Temperature (in millicelcius) at which the fan turns on (default 50000)

poe_fan_temp0_hyst Temperature delta (in millicelcius) at which the fan turns off (default 5000)

poe_fan_temp1 Temperature (in millicelcius) at which the fan speeds up (default 55000)

poe_fan_temp1_hyst Temperature delta (in millicelcius) at which the fan slows down (default 5000)
Open Nano to edit the boot config, like this:
sudo nano /boot/config.txt
Near the bottom add something like this:
# PoE Hat Fan Speeds
dtparam=poe_fan_temp0=65000,poe_fan_temp0_hyst=5000
dtparam=poe_fan_temp1=67000,poe_fan_temp1_hyst=2000
Then, reboot! Now, the fans won’t kick on until they hit 65’C, they’ll speed up at 67’C. For my setup, that silences them almost completely, while still keeping them reasonably cool and safe.
Bonus: you can apparently set up to 4 different temps, like:
# PoE Hat Fan Speeds
dtparam=poe_fan_temp0=50000
dtparam=poe_fan_temp1=60000
dtparam=poe_fan_temp2=70000
dtparam=poe_fan_temp3=80000
-
Unifi Network – Fixing WPA Authentication Timeout/Failure
Does this look familiar?
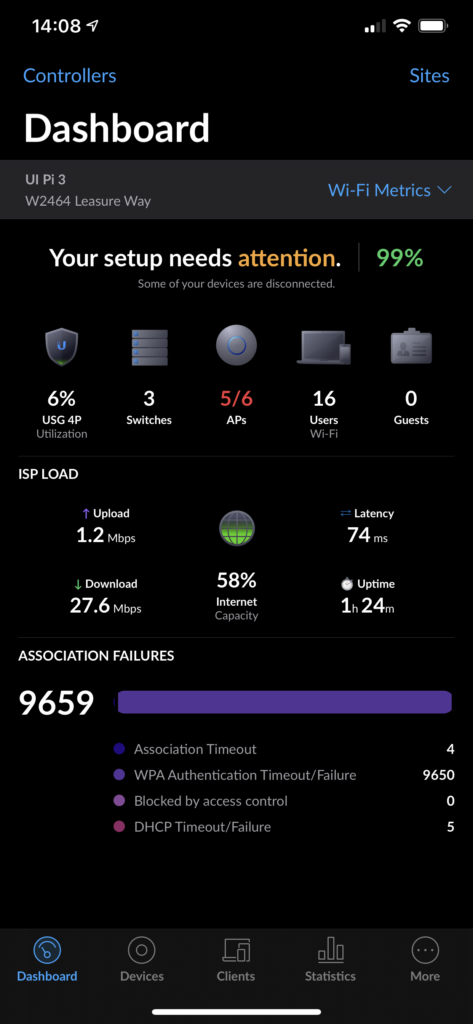
9650 failures?! Holy schmoly! If you’re like me, then you probably searched the web for a clue, maybe found some threads in the UI.com Community Forums, but ultimately left feeling pretty uneducated about what it number means and anything you should do about it.
Good news! This number being high isn’t going to negatively impact the performance of your network, but it also isn’t good. It’s the equivalent of a denial-of-service attack. Some wireless device is trying and failing to connect to your network, over and over again.
This happened to me and my home network after tuning my WiFi Access Point channels and Hue Bridge channels, trying to avoid as much interference between them as possible. After a few hours of RF scans and reconfigurations triggering reboots, I saw this number skyrocket from single-digits to over 10k eventually. (Keep in mind that I’d only switched WiFi channels, and did not rename the SSID or password, and didn’t enable or disable any 2.4 or 5 gigahertz bands.)
What happened?
The SSID and Passwords on all devices in my home were set and working totally fine before, so why all of a sudden would rebooting a few access points cause problems? My best guess is that something related to DTIM simply prevented a properly configured wireless client from successfully reconnecting to the network, but I’m honestly not really sure.
What should I do?
If you are in control of the wireless devices that connect to your network (like a home network or a small office) then this is completely within your power to fix.
All you need to do is figure out which wireless device(s) are trying and failing.
The Unifi Network Controller software does not give you any tools or logs to help you here. You’ll simply need to deduce on your own what they are.
Depending on the number and types of devices on your network, this deduction/elimination process may not be super simple. I started with problematic devices first, but resetting them didn’t help. I used the Unifi Network Controller Client list to go through them one at a time and check them manually.
My iPad Pro was successfully connected to my wireless network according to Network Controller, and that iPad was showing up as a connected HomeKit hub on Standby, so clearly it’s connecting, right?
The first time I had this happen, it was a Nintendo 3DS XL. But recently, it was that darned iPad Pro! Touching the screen revealed it was connected to LTE, and not WiFi. I opened the Settings app and went to WiFi, but connecting to the SSID for my home failed, and prompted me to update the password. Typing in the same password did not allow the device to connect either time. I needed to delete the SSID from the settings, and add it back in.
This was tricky on the iPad Pro, because the WiFi networks you connect your devices to get saved in your iCloud account. Removing it from one device removes it from others, which meant I needed to reconnect my iPhone and my laptop too.
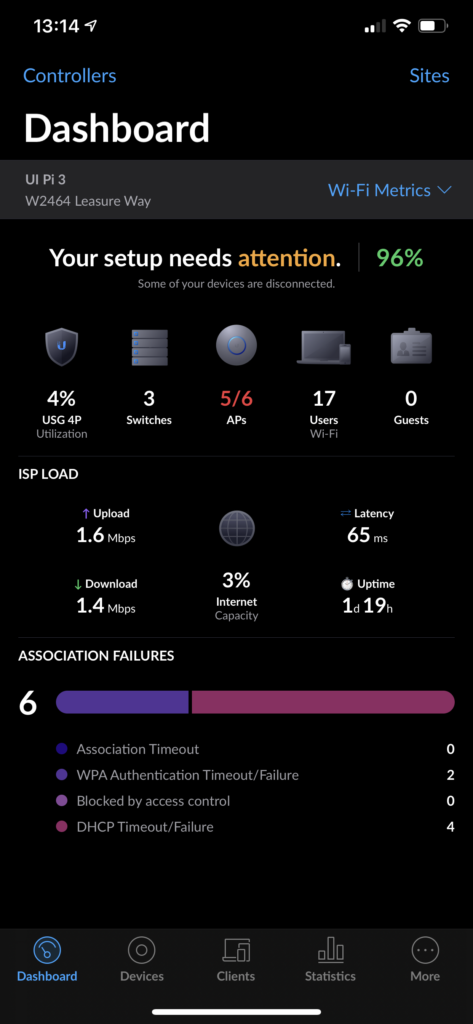
Having done so, this number has reduced itself down to a more reasonable value:
It would be nice if the Network Controller logged failed attempts to access the network somewhere. I get that this could probably be easily spammed, but it isn’t a super good experience to show off some huge scary number without any indication as to what is going wrong or what to do about it.
Maybe a future version will open this up for us!
-
Get snap.jpeg from UniFi Protect Cameras
How to get the correct username & password for a UniFi camera that has already been adopted by UniFi Protect:
- Get into Protect UI https://protect.ui.com/
- Select NVR you’d like to use
- On left bottom corner click the Settings gear
- Click Advanced
- On the right side, you’ll see Device password, click REVEAL
- Copy the password
- Connect to the Camera IP through https, e.g.
https://your.camera.ip.address - Login with username
ubntand password from above - Skip device setup, keep it in Unifi Video mode
- Enable the “Anonymous Snapshot” on the camera
- From there you should be able to access
http://your.camera.ip.address/snap.jpeg
-
Hue Bridge PoE
I was running out of outlets in the UPS in my 6RU rack, and found myself wondering if it were possible to convert a Hue Bridge to be powered over ethernet rather than the big white wall-wort.
Turns out, Amazon made this really simple.
First, buy this PoE converter, and switch it to 5V.
Next, buy this adapter, and connect it to the small power cord included with the above converter.
The supplied power cord is around 10″ in length, so you may want to pick up a 12″ Cat6 ethernet patch-cable as well, if you don’t already have one.
Lastly, plug the converter into your PoE source, then plug the power and data cables from the converter into your Hue Bridge.
Everything should power on and light up normally. If it doesn’t, retrace the above steps and try again.
-
Install Homebridge UI on Raspberry Pi (3 or 4 preferred)
This is for a fresh install of Homebridge UI with auto-start on reboot or error.
If you are trying to convert an existing install, this step-by-step will not work for you, and you’ll need to modify it to suit your needs.
- Edit your Homebridge config to enable standalone mode:
sudo nano /var/homebridge/config.json
…and paste this into it. - Create the executable service:
sudo nano /etc/systemd/system/homebridge-config-ui-x.service
…and paste this into it. - Reload all of the daemons
sudo systemctl daemon-reload - Enable the Homebridge service to start:
sudo systemctl enable homebridge-config-ui-x - Start Homebridge yourself:
sudo systemctl start homebridge-config-ui-x
Platform in
/var/homebridge/config.json:"platforms": [ { "platform": "config", "name": "Config", "port": 8080, "standalone": true, "restart": "sudo -n systemctl restart homebridge homebridge-config-ui-x" } ]Contents of
/etc/systemd/system/homebridge-config-ui-x.service:[Unit] Description=Homebridge Config UI X After=syslog.target network-online.target [Service] Type=simple User=homebridge EnvironmentFile=/etc/default/homebridge ExecStart=/usr/bin/homebridge-config-ui-x $HOMEBRIDGE_OPTS Restart=on-failure RestartSec=3 KillMode=process CapabilityBoundingSet=CAP_IPC_LOCK CAP_NET_ADMIN CAP_NET_BIND_SERVICE CAP_NET_RAW CAP_SETGID CAP_SETUID CAP_SYS_CHROOT CAP_CHOWN CAP_FOWNER CAP_DAC_OVERRIDE CAP_AUDIT_WRITE CAP_SYS_ADMIN AmbientCapabilities=CAP_NET_RAW [Install] WantedBy=multi-user.target - Edit your Homebridge config to enable standalone mode:
-
Install Homebridge on Raspberry Pi (3 or 4 preferred)
This is for a fresh install of Homebridge with auto-start on reboot or error.
If you are trying to convert an existing install, this step-by-step will not work for you, and you’ll need to modify it to suit your needs.
- Create the Default Settings file:
sudo nano /etc/default/homebridge
…and paste this into it. - Create the executable service:
sudo nano /etc/systemd/system/homebridge.service
…and paste this into it. - Create a user to run the service:
sudo useradd --system homebridge - Create the directory for Homebridge to live in:
sudo mkdir /var/homebridge - Open up the directory permissions:
sudo chmod -R 0777 /var/homebridge - Reload all of the daemons
sudo systemctl daemon-reload - Enable the Homebridge service to start:
sudo systemctl enable homebridge - Start Homebridge yourself:
sudo systemctl start homebridge
Troubleshooting:
journalctl -f -u homebridgeto view the logssystemctl status homebridgeto check the service status.
Contents of
/etc/defaults/homebridge:# Defaults / Configuration options for homebridge # The following settings tells homebridge where to find the config.json file and where to persist the data (i.e. pairing and others) HOMEBRIDGE_OPTS=-U /var/homebridge # If you uncomment the following line, homebridge will log more # You can display this via systemd’s journalctl: journalctl -f -u homebridge # DEBUG=*Contents of
/etc/systemd/system/homebridge.service:[Unit] Description=Node.js HomeKit Server After=syslog.target network-online.target [Service] Type=simple User=homebridge EnvironmentFile=/etc/default/homebridge ExecStart=/usr/bin/homebridge $HOMEBRIDGE_OPTS Restart=on-failure RestartSec=10 KillMode=process [Install] WantedBy=multi-user.target - Create the Default Settings file:
-
A Lady Stole Our Goats
At 4:33am this morning, a lady passed our house, slammed on her brakes, threw her car in reverse, threw her hazards on, parked facing oncoming traffic, on a state highway, to steal 2 steel goats we had on our front lawn.