JJJ's Blog

  • WordPress
  • GitHub
  • Twitter/X
  • Driveway Timelapse

    JJJ

    September 3, 2019
    Home
  • Empty Space in macOS Dock

    defaults write com.apple.dock persistent-apps -array-add '{"tile-type"="spacer-tile";}'; killall Dock

    JJJ

    August 26, 2019
    Software
    Apple, macOS
  • A bunny tipped our goat!

    JJJ

    July 27, 2019
    Family, Funny, Uncategorized
    Bunny, Goats
  • Hue Bridge PoE

    I was running out of outlets in the UPS in my 6RU rack, and found myself wondering if it were possible to convert a Hue Bridge to be powered over ethernet rather than the big white wall-wort.

    Turns out, Amazon made this really simple.

    First, buy this PoE converter, and switch it to 5V.

    Next, buy this adapter, and connect it to the small power cord included with the above converter.

    The supplied power cord is around 10″ in length, so you may want to pick up a 12″ Cat6 ethernet patch-cable as well, if you don’t already have one.

    Lastly, plug the converter into your PoE source, then plug the power and data cables from the converter into your Hue Bridge.

    Everything should power on and light up normally. If it doesn’t, retrace the above steps and try again.

    JJJ

    July 22, 2019
    Hue
    PoE
  • Install Homebridge UI on Raspberry Pi (3 or 4 preferred)

    This is for a fresh install of Homebridge UI with auto-start on reboot or error.

    If you are trying to convert an existing install, this step-by-step will not work for you, and you’ll need to modify it to suit your needs.

    1. Edit your Homebridge config to enable standalone mode:
      sudo nano /var/homebridge/config.json
      …and paste this into it.
    2. Create the executable service:
      sudo nano /etc/systemd/system/homebridge-config-ui-x.service
      …and paste this into it.
    3. Reload all of the daemons
      sudo systemctl daemon-reload
    4. Enable the Homebridge service to start:
      sudo systemctl enable homebridge-config-ui-x
    5. Start Homebridge yourself:
      sudo systemctl start homebridge-config-ui-x

    Platform in /var/homebridge/config.json:

    "platforms": [
        {
          "platform": "config",
          "name": "Config",
          "port": 8080,
          "standalone": true,
          "restart": "sudo -n systemctl restart homebridge homebridge-config-ui-x"
       }
    ]

    Contents of /etc/systemd/system/homebridge-config-ui-x.service:

    [Unit]
    Description=Homebridge Config UI X
    After=syslog.target network-online.target
    
    [Service]
    Type=simple
    User=homebridge
    EnvironmentFile=/etc/default/homebridge
    ExecStart=/usr/bin/homebridge-config-ui-x $HOMEBRIDGE_OPTS
    Restart=on-failure
    RestartSec=3
    KillMode=process
    CapabilityBoundingSet=CAP_IPC_LOCK CAP_NET_ADMIN CAP_NET_BIND_SERVICE CAP_NET_RAW CAP_SETGID CAP_SETUID CAP_SYS_CHROOT CAP_CHOWN CAP_FOWNER CAP_DAC_OVERRIDE CAP_AUDIT_WRITE CAP_SYS_ADMIN
    AmbientCapabilities=CAP_NET_RAW
    
    [Install]
    WantedBy=multi-user.target

    JJJ

    July 16, 2019
    Homebridge
    Config UI
  • Install Homebridge on Raspberry Pi (3 or 4 preferred)

    This is for a fresh install of Homebridge with auto-start on reboot or error.

    If you are trying to convert an existing install, this step-by-step will not work for you, and you’ll need to modify it to suit your needs.

    1. Create the Default Settings file:
      sudo nano /etc/default/homebridge
      …and paste this into it.
    2. Create the executable service:
      sudo nano /etc/systemd/system/homebridge.service
      …and paste this into it.
    3. Create a user to run the service:
      sudo useradd --system homebridge
    4. Create the directory for Homebridge to live in:
      sudo mkdir /var/homebridge
    5. Open up the directory permissions:
      sudo chmod -R 0777 /var/homebridge
    6. Reload all of the daemons
      sudo systemctl daemon-reload
    7. Enable the Homebridge service to start:
      sudo systemctl enable homebridge
    8. Start Homebridge yourself:
      sudo systemctl start homebridge

    Troubleshooting:

    • journalctl -f -u homebridge to view the logs
    • systemctl status homebridge to check the service status.

    Contents of /etc/defaults/homebridge:

    # Defaults / Configuration options for homebridge
    # The following settings tells homebridge where to find the config.json file and where to persist the data (i.e. pairing and others)
    HOMEBRIDGE_OPTS=-U /var/homebridge
    
    # If you uncomment the following line, homebridge will log more
    # You can display this via systemd’s journalctl: journalctl -f -u homebridge
    # DEBUG=*

    Contents of /etc/systemd/system/homebridge.service:

    [Unit]
    Description=Node.js HomeKit Server
    After=syslog.target network-online.target
    
    [Service]
    Type=simple
    User=homebridge
    EnvironmentFile=/etc/default/homebridge
    ExecStart=/usr/bin/homebridge $HOMEBRIDGE_OPTS
    Restart=on-failure
    RestartSec=10
    KillMode=process
    
    [Install]
    WantedBy=multi-user.target

    JJJ

    July 16, 2019
    Homebridge
  • Heidenberg

    Today I released (on GitHub) a simple version of a simple WordPress plugin to cryptographically sign your posts.

    It works by splitting your post content up into words and stenographically inserting zero-width characters between them. Together, those characters combine into a hidden pattern that is unique to your website and that post.

    If someone copies your post content, they’ll also unknowingly copy the hidden characters along with it.

    A second version of this plugin could include a UI to compare someone else’s content and verify whether or not it was plagiarized from yours.

    It’s also likely I will need to tweak the algorithm over time, as flaws with this first-pass approach will probably come up.

    This plugin is non-destructive, so you can safely use it without worrying about your data. The worst thing that could happen is that this plugin just does nothing. 😁

    JJJ

    June 25, 2019
    WordPress
    Plugins
  • Wordpress

    In case (ha!) you hadn’t heard, spelling WordPress correctly (with a capital P) is a big deal in WordPress land. You see, there are a lot of folks in the world claiming to be “WordPress Experts” without knowing how to correctly spell WordPress. I mean… if they get this wrong, what else will they get wrong? If they miss this obvious detail, just think of all the other less obvious details they’ll also miss.

    There are "experts" in 'small p' WordPress and experts in WordPress. Please make sure you hire WordPress (capital P) experts! You'll be glad you did.

    — Brad Williams (@williamsba) May 14, 2019

    Brad’s not wrong. The world is full of individuals hoping to exploit a knowledge gap, call themselves an Expert in something, and make a quick buck or two in the process. Those people, in that scenario, are bad. But can we really be sure these are scammers, and not just mistakes?

    Brad, if you’re reading this, this isn’t me calling you out. You reminded me I wanted to blog about this. I get what you mean, and you’re right to tell people to look at all the signs and trust their spidey-senses. I’m sorry I bombed into your Twitter replies. ❤️

    A few years ago, WordPress itself started coming bundled with a function that would autocorrect many of the most common misspelled variants. This isn’t new; Apple’s iOS and macOS have been autocorrecting the casing of every single one of their own product names for years before WordPress was.

    The inclusion of this function was kind’ve a hot topic, because it was WordPress internally changing up the way content was displayed to users differently than it was written, without explicit author consent. It was no longer as the author intended it, so if I want to intentionally type “wordpress” then that’s no longer my decision, and WordPress is going to prevent it, whether you like it or not.

    In the end, it didn’t really make that much of a difference. The world kept turning, content kept getting published, and nobody really noticed barring for a few noisy journalists with podcasts… ahem.

    Some of us used a small snippet of code to remove these filters.

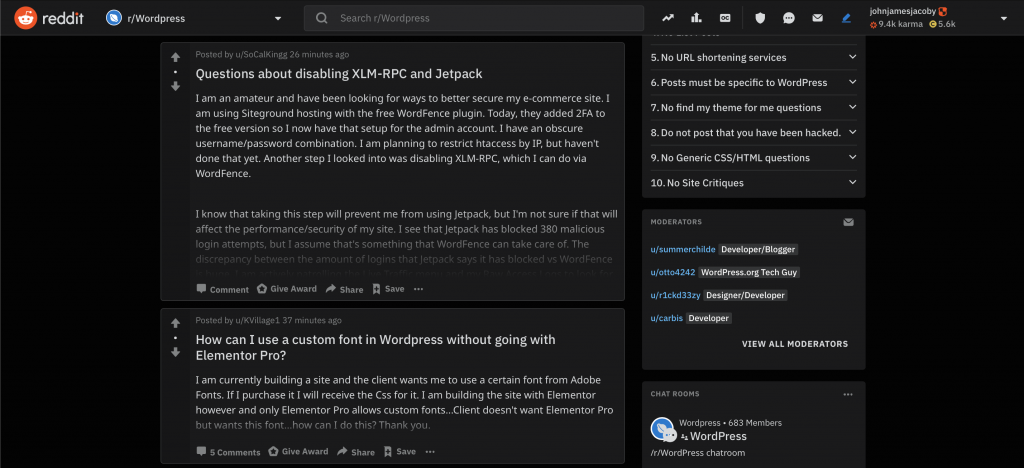
    One problem is that it’s really easy to get the spelling wrong. Even the official WordPress subreddit is wrong, and people get it wrong constantly in that forum and everywhere else on the web:

    The WordPress Subreddit. Spot all of the typos!

    The capital P has become a little bit of a war cry, actually. People will raise their hands at WordCamps to interrupt talks to alert speakers to typos in their slides. People will not hire otherwise qualified applicants because they get this wrong. People are separating themselves from others because they do not see this very specific detail.

    Nelson Muntz from The Simpsons saying "Ha ha!"

    You spelled it “Wordpress”

    Frankly, it’s a little bit elitist, and comes across quite crudely – from a position of annoyance, disappointment, or wanting to segregate those who get it from those who do not. That’s dangerous stuff when weaponized.

    Making jokes at the expense of someone who isn’t in your group, is really just bullying with extra steps.

    Democratizing publishing is providing opportunity

    I feel, today, right now, like it’s really unfair to use what people do not know or have not seen or do not yet understand against them. I remember clearly applying for jobs, hoping that anyone would take a chance, knowing it wasn’t something I’d done professionally yet, to pay me for what I was capable of achieving outside of what my resume documented.

    Not everyone has the same education. Not everyone has the same experience. Everyone is focusing on very different areas of expertise, and not all of that requires exceptional attention to brand awareness. Everyone struggles, maybe with words sometimes.

    If you spell WordPress incorrectly, it’s OK, and not everyone in the WordPress community is Nelson Muntz’ing you.

    JJJ

    May 14, 2019
    WordPress
  • Variable SSL certificate directives in nginx (part 2)

    Feeling encouraged by my friend Jeremy Felt’s blog post on the subject, I thought I may finally be able to achieve the panacea of WordPress Multi-Network SSL configurations:

    (more…)

    JJJ

    May 6, 2019
    Software, WordPress
    nginx
  • Install nginx from source

    At the time of this writing, the latest stable version of nginx is 1.16.0, and none of the package managers have updated themselves to include it.

    Before you get started, you’ll want to be logged in to an open terminal session with a user that has sudo access. The reason for this, is because nginx itself requires root access when it starts up, to bind itself to lower number ports (usually 80 and 443.)

    You’ll also notice that I use nano for editing files. Use what you prefer.

    First, stop any version of nginx that might already be running:

    sudo service nginx stop

    Next, you’re going download the latest version of nginx directly from the official website:

    cd ~/
    wget http://nginx.org/download/nginx-1.16.0.tar.gz

    Next, decompress it, and change into the new directory it made:

    tar xvf nginx-1.16.0.tar.gz nginx-1.16.0/
    cd nginx-1.16.0/

    Next, you’ll probably want to install some related dependencies. Below is a pretty general list, but if you know better for yourself, replace these as needed:

    sudo apt-get install -y curl build-essential make gcc libpcre3 libpcre3-dev libpcre++-dev zlib1g-dev libbz2-dev libxslt1-dev libxml2-dev libgd2-xpm-dev libgeoip-dev libgoogle-perftools-dev libperl-dev libssl-dev libcurl4-openssl-dev libatomic-ops-dev

    Next, you’ll want to configure nginx.

    There are about a million different ways to do this depending on your needs. For our purposes (and for most people reading this) the below approach should be sufficient:

    sudo ./configure \
    --user=nginx \
    --group=nginx \
    --prefix=/etc/nginx \
    --sbin-path=/usr/sbin/nginx \
    --modules-path=/usr/lib/nginx/modules \
    --conf-path=/etc/nginx/nginx.conf \
    --error-log-path=/var/log/nginx/error.log \
    --http-log-path=/var/log/nginx/access.log \
    --pid-path=/var/run/nginx.pid \
    --lock-path=/var/run/nginx.lock \
    --http-client-body-temp-path=/var/cache/nginx/client_temp \
    --http-proxy-temp-path=/var/cache/nginx/proxy_temp \
    --http-fastcgi-temp-path=/var/cache/nginx/fastcgi_temp \
    --http-uwsgi-temp-path=/var/cache/nginx/uwsgi_temp \
    --http-scgi-temp-path=/var/cache/nginx/scgi_temp \
    --with-select_module \
    --with-poll_module \
    --with-threads \
    --with-file-aio \
    --with-http_ssl_module \
    --with-http_v2_module \
    --with-http_realip_module \
    --with-http_addition_module \
    --with-http_xslt_module \
    --with-http_xslt_module=dynamic \
    --with-http_image_filter_module \
    --with-http_image_filter_module=dynamic \
    --with-http_geoip_module \
    --with-http_geoip_module=dynamic \
    --with-http_sub_module \
    --with-http_dav_module \
    --with-http_flv_module \
    --with-http_mp4_module \
    --with-http_gunzip_module \
    --with-http_gzip_static_module \
    --with-http_auth_request_module \
    --with-http_random_index_module \
    --with-http_secure_link_module \
    --with-http_degradation_module \
    --with-http_slice_module \
    --with-http_stub_status_module \
    --with-http_perl_module \
    --with-http_perl_module=dynamic \
    --with-mail \
    --with-mail=dynamic \
    --with-mail_ssl_module \
    --with-stream \
    --with-stream=dynamic \
    --with-stream_ssl_module \
    --with-stream_realip_module \
    --with-stream_geoip_module \
    --with-stream_geoip_module=dynamic \
    --with-stream_ssl_preread_module \
    --with-google_perftools_module \
    --with-cpp_test_module \
    --with-compat \
    --with-pcre \
    --with-pcre-jit \
    --with-zlib-asm=CPU \
    --with-libatomic \
    --with-debug \
    --with-ld-opt="-Wl,-E"

    Many of the above flags are important, but I think the most important one for our purposes is --with-debug because without that flag, you cannot log any of nginx’s important debug information, in the event something isn’t working correctly.

    Next, you need to build the executable from the configured source. You’ll make it and install it like this:

    sudo make && sudo make install

    Next, you’ll want nginx to autostart on boot, so:

    sudo nano /lib/systemd/system/nginx.service

    And put this in there:

    [Unit]
    Description=The NGINX HTTP and reverse proxy server
    After=syslog.target network.target remote-fs.target nss-lookup.target
    
    [Service]
    Type=forking
    PIDFile=/var/run/nginx.pid
    ExecStartPre=/usr/sbin/nginx -t
    ExecStart=/usr/sbin/nginx
    ExecReload=/bin/kill -s HUP $MAINPID
    ExecStop=/bin/kill -s QUIT $MAINPID
    PrivateTmp=true
    
    [Install]
    WantedBy=multi-user.target

    Then run these two commands and nginx should fire right up:

    sudo systemctl daemon-reload
    sudo service nginx start

    All done!

    JJJ

    May 1, 2019
    Software
    nginx
Previous Page
1 2 3 4 5 6 … 55
Next Page

Proudly Powered by WordPress